Cluster Services
Cluster services are optional Gardener extensions that add functionality to a Shoot cluster, such as certificate management, S3 storage or audit logging. The OSC Dashboard provides a Cluster Services section that allows you to enable, disable and configure these extensions without editing the raw Shoot manifest.
Overview
The Cluster Services section allows you to:
- Enable or disable an extension for a Shoot cluster
- Edit the extension's provider configuration using a form
- Preview and edit the resulting Shoot manifest before saving
- Open the documentation page of each extension
Note
The list of available cluster services depends on the configuration of your OSC Dashboard installation. If a service described here is not visible in your environment, it has not been enabled by your platform operator. If no services are enabled at all, the section shows "No cluster services are available." No action is required from you in this case — if you expect a service that is not listed, contact your platform operator.
Prerequisites
- Access to the OSC Dashboard with project permissions
- Permission to edit Shoots (or to create Shoots, when configuring a service during Shoot creation)
Info
The configure (cog) button is hidden if you lack the permission to modify the Shoot, and it is disabled while the Shoot is marked for deletion.
Accessing Cluster Services
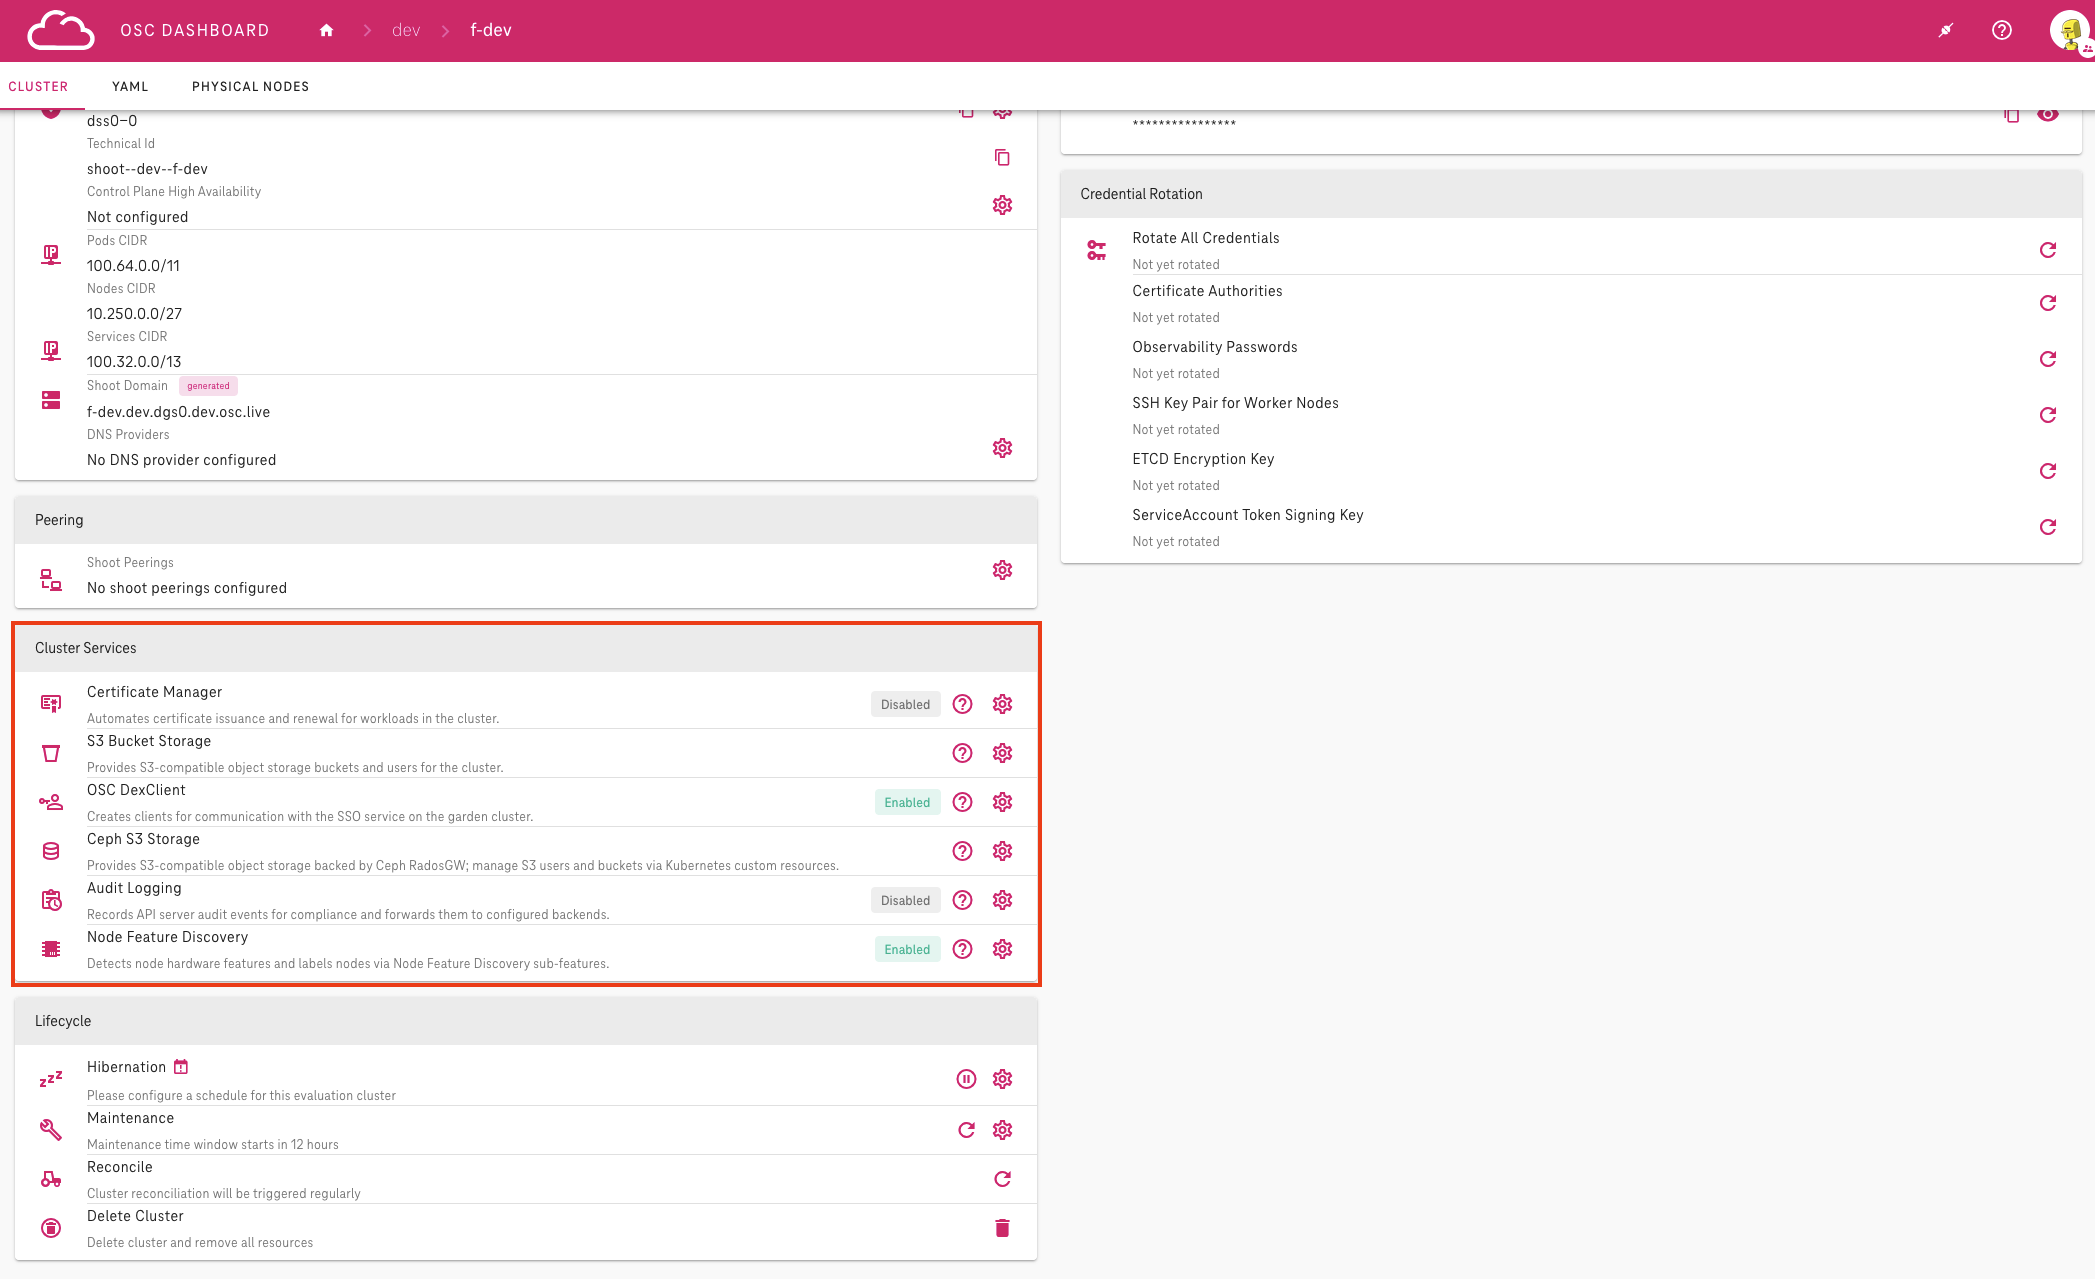
On an existing Shoot
- Open the Shoot detail page.
- Scroll to the Cluster Services section.
- Each service is listed with its name, a short description and its status.
- Click the cog button next to a service to open its configuration dialog, or the help button (Open documentation) to open its documentation page in a new tab. The same help button is also available in the toolbar of the configuration dialog — use it to check the configuration options and defaults of a service while editing it.
During Shoot creation
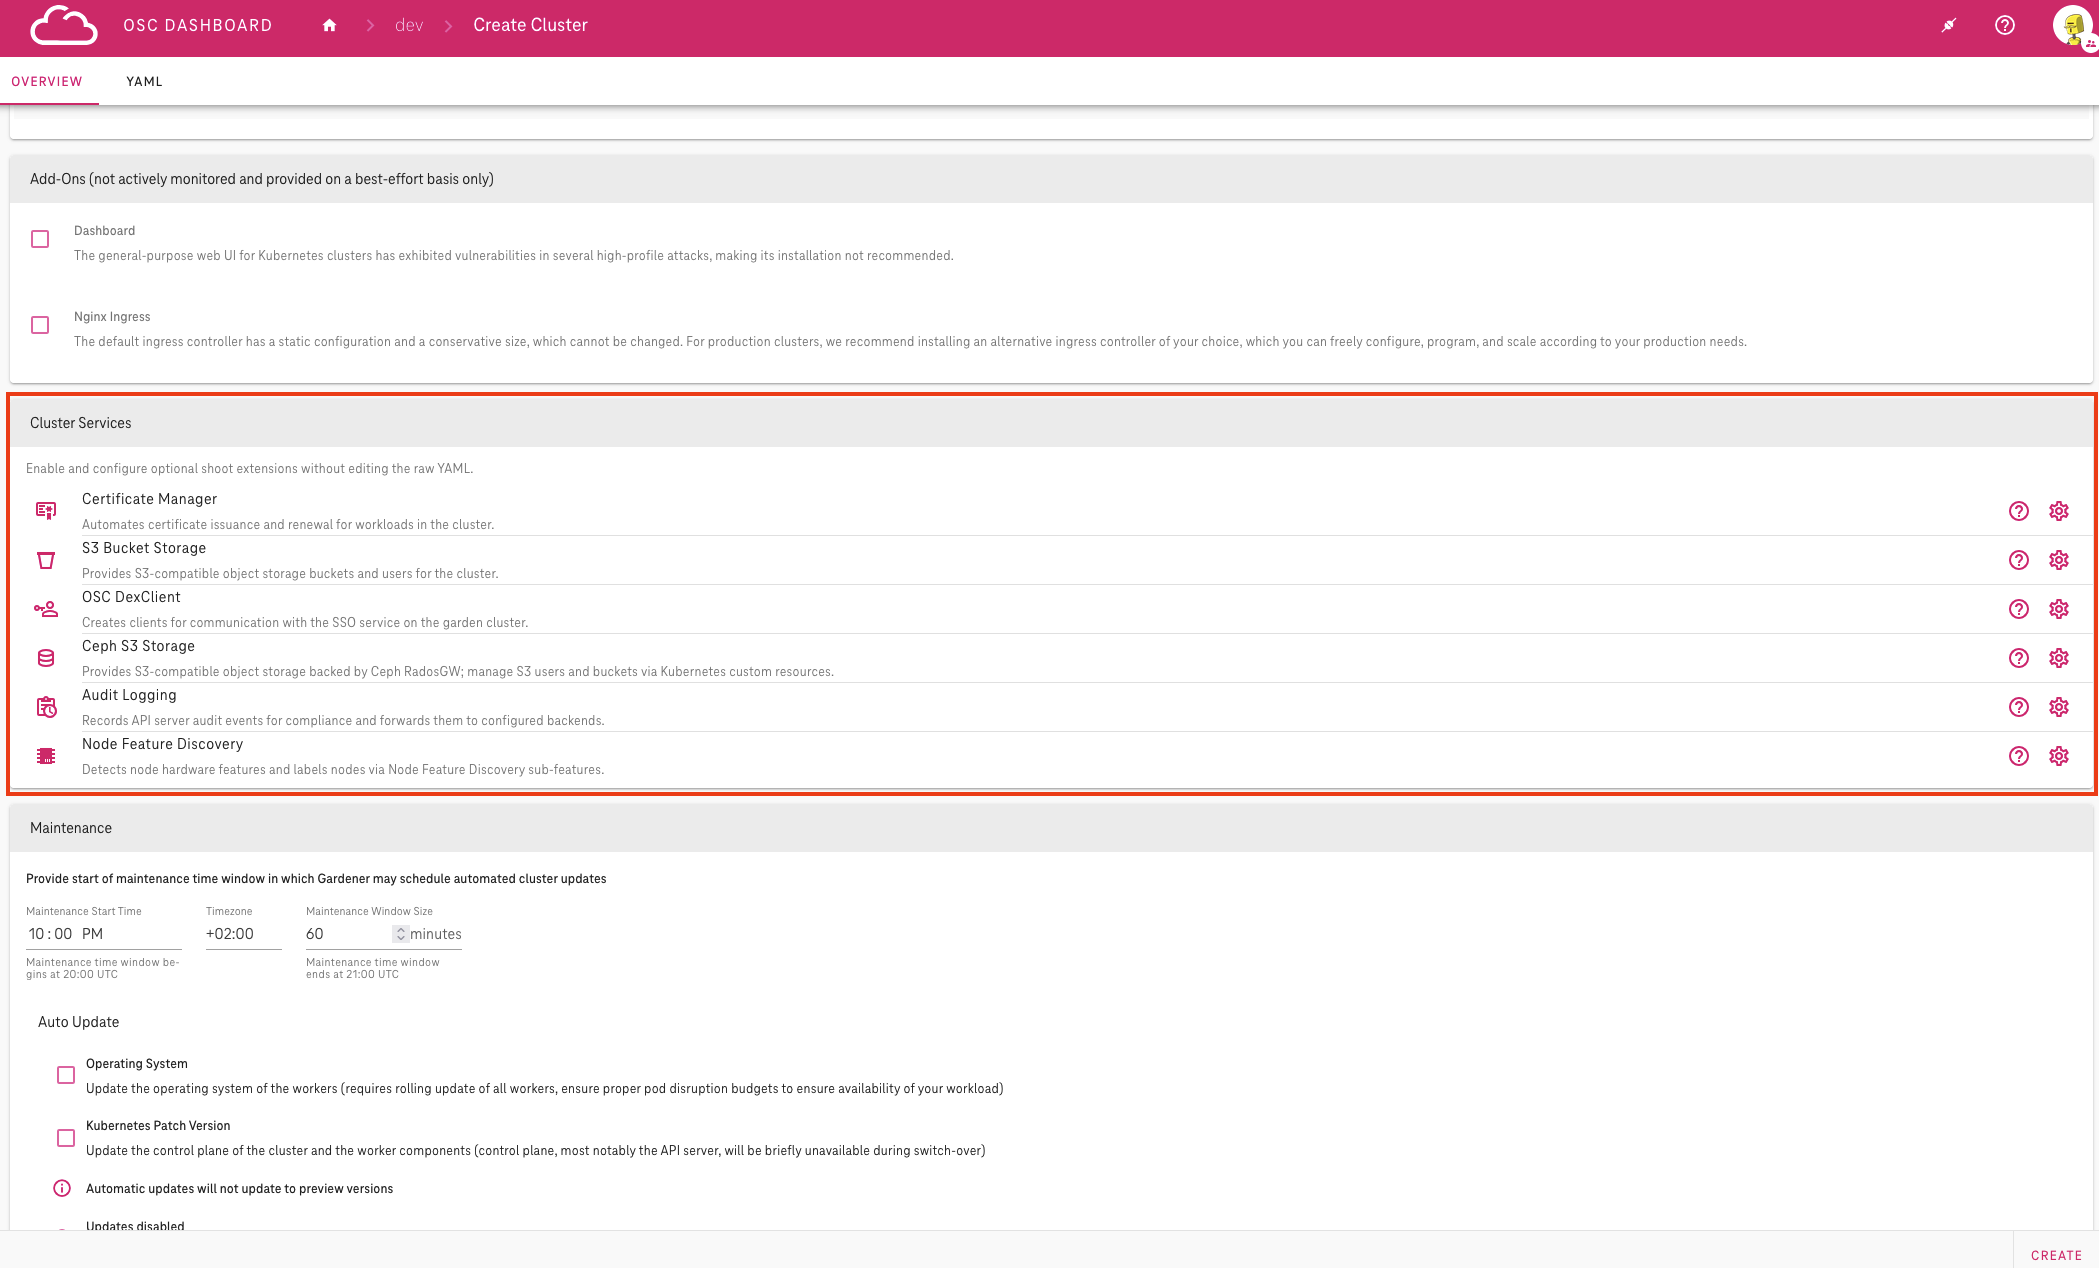
Cluster services can also be configured while creating a new Shoot, avoiding the need to open the configuration dialog afterwards.
- In your project, click Create Cluster to open the new Shoot form.
- Scroll to the Cluster Services section, located between the Add-ons and Maintenance sections.
- Configure the desired services as described below.
- Fill in the remaining fields and click Create.
Service Status
Each service row shows a status chip reflecting the extension entry in the Shoot's manifest.
| Chip | Meaning |
|---|---|
| Green Enabled | The Shoot manifest explicitly enables the extension. |
| Grey Disabled | The Shoot manifest explicitly disables the extension. |
| No chip | The Shoot manifest has no entry for the extension. The default behaviour applies. |
The Configuration Dialog
Clicking the cog button opens the configuration dialog for a service.
The dialog edits the extension's entry under spec.extensions
in the Shoot manifest.
All changes are validated before saving.
Enabling or disabling a service
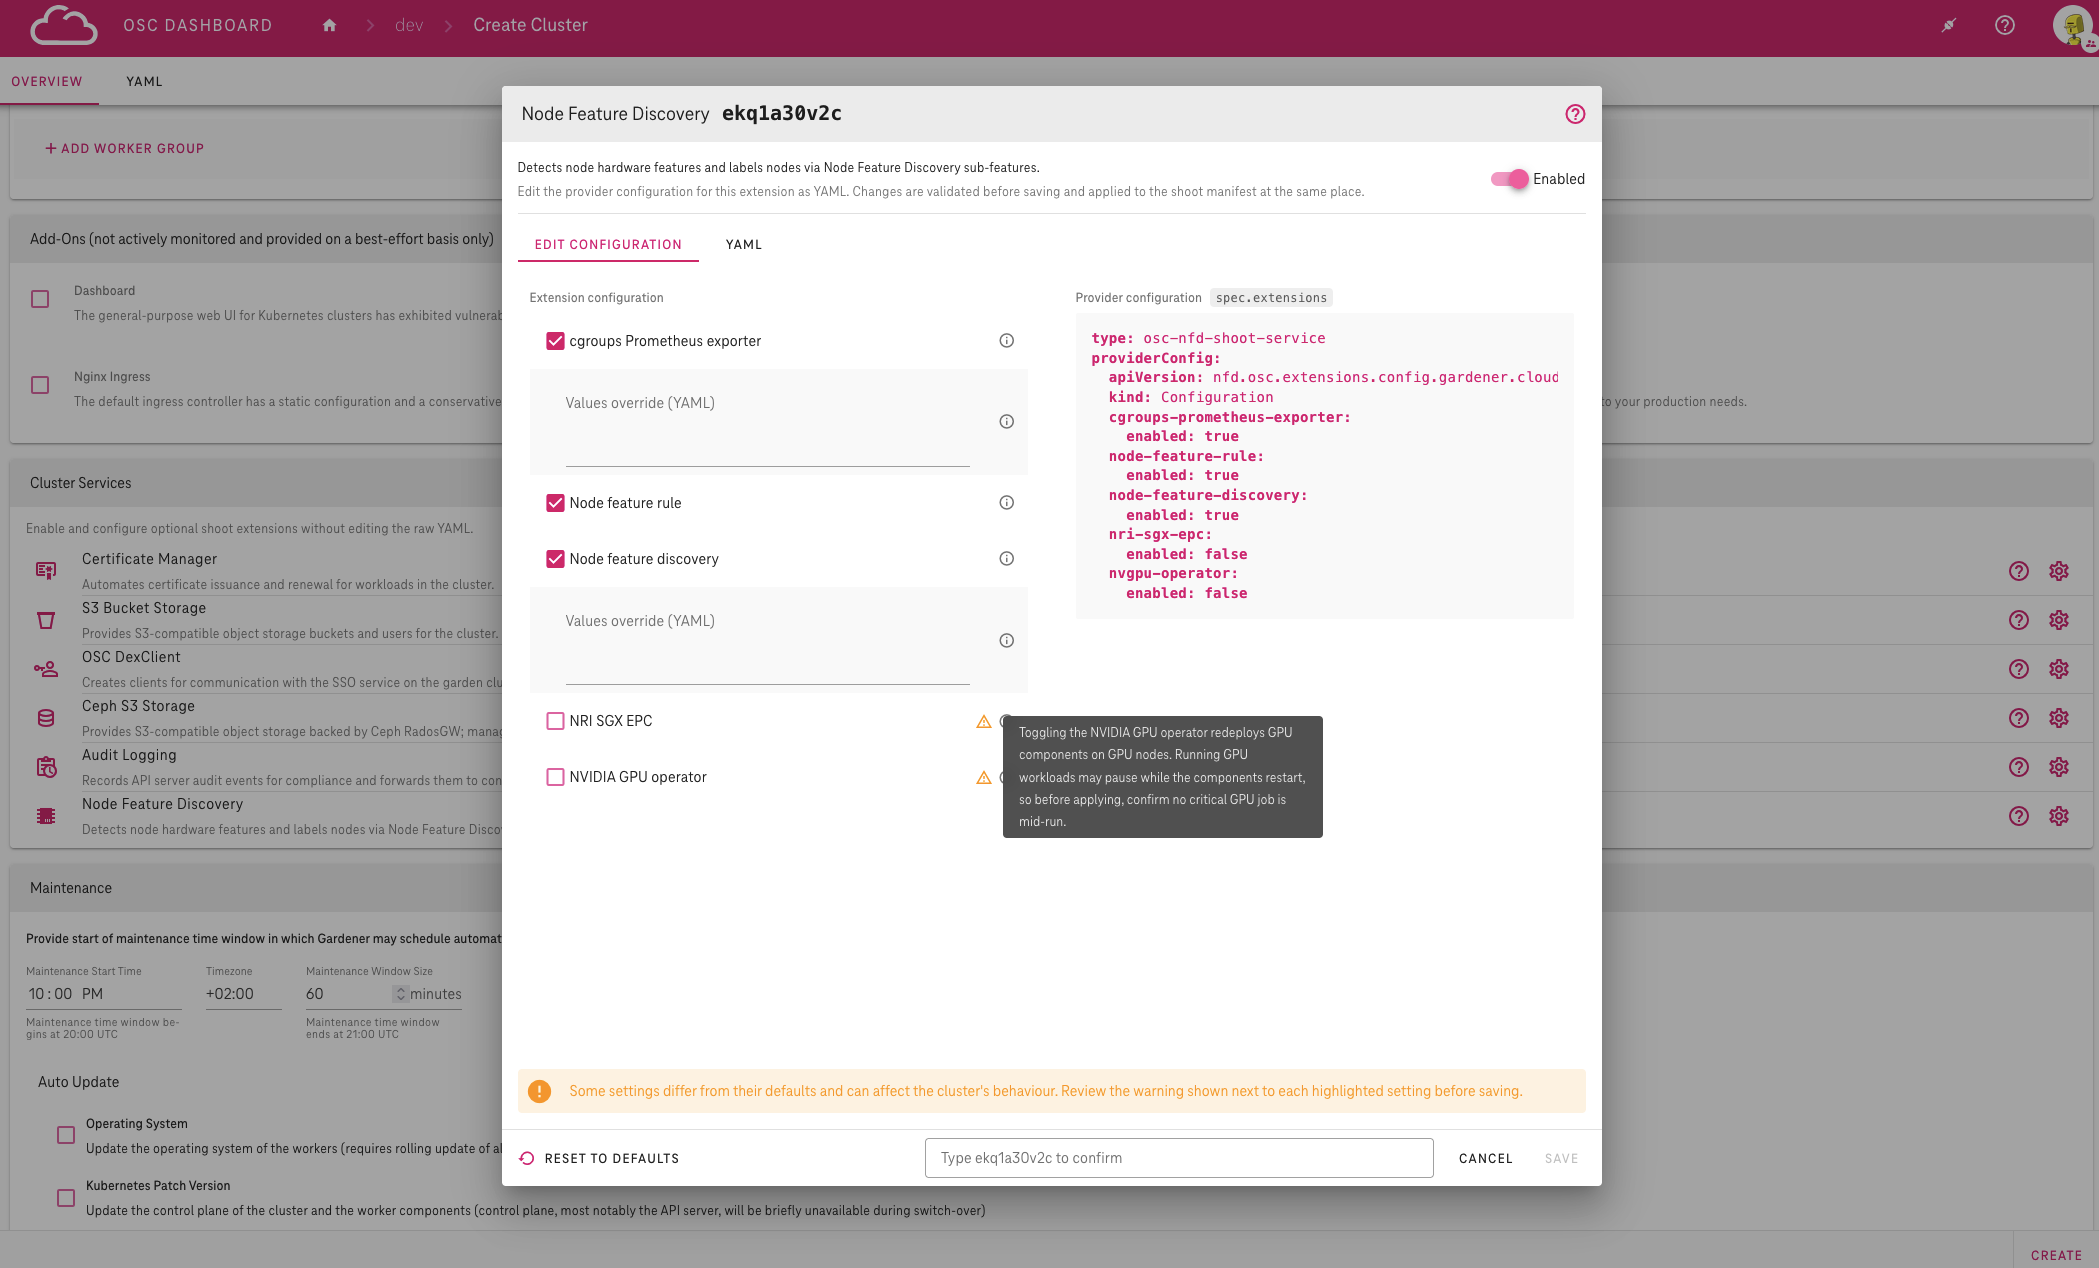
Use the Enabled/Disabled switch in the top-right corner of the dialog to turn the service on or off.
Info
Disabling a service does not discard its configuration. The configuration form becomes read-only while the service is disabled, and the previous values are restored when it is enabled again. Only Reset to defaults reverts the configuration to its default values.
Edit configuration tab
The Edit configuration tab shows the configuration form of the service on the left.
The Provider configuration panel on the right shows a live preview
of the resulting spec.extensions entry,
updated as you change values in the form.
Services without configuration options show "This extension has no configuration options." instead of a form.
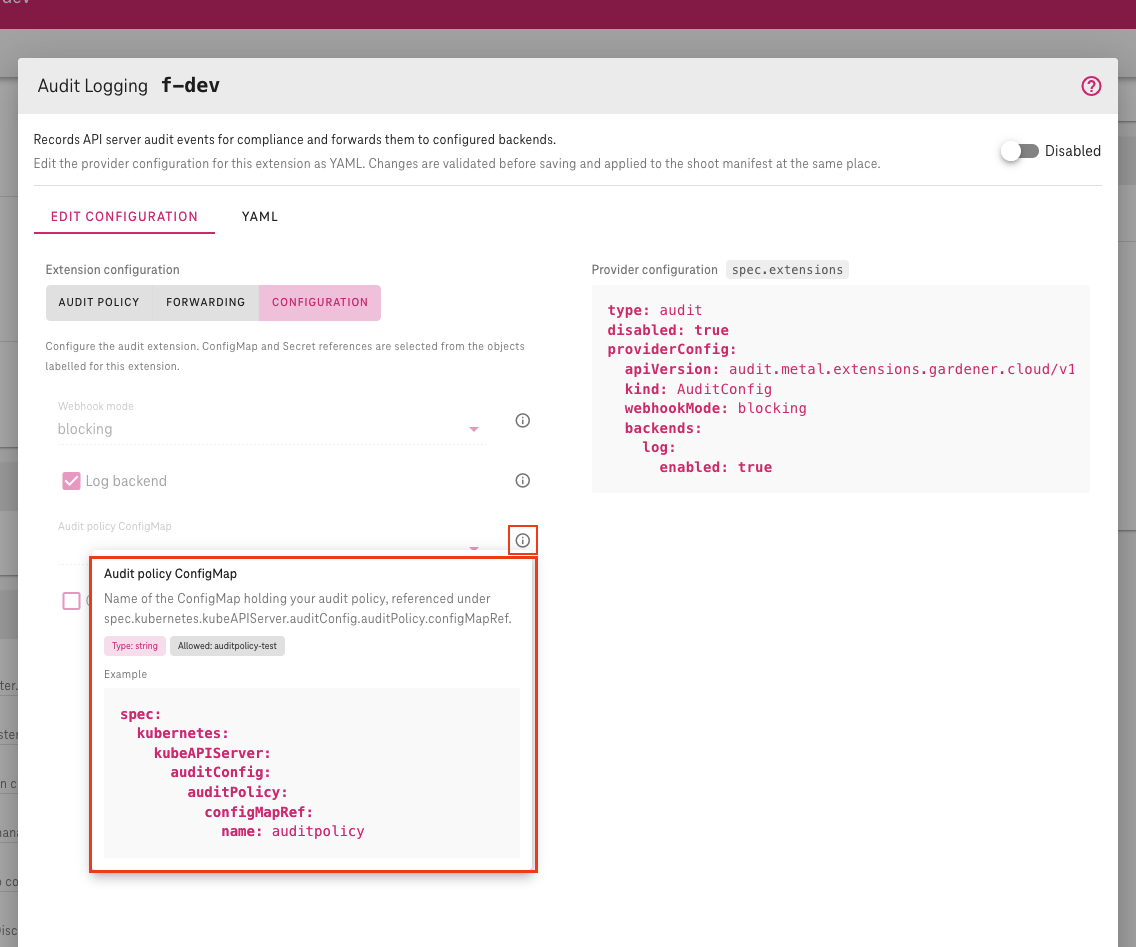
Attribute help
Every configuration attribute has an info icon next to it. Hovering over it opens a popup with detailed information about the attribute:
- a description of what it does,
- its type,
- the allowed values and
- an example showing how the attribute can be configured.
YAML examples can be copied directly from the popup.
Use these popups to find out what an option means without leaving the dialog.
Warnings for non-default values
When the value of an attribute is not equal to its default (the default mentioned in the documentation and the help popup), a warning icon appears next to the affected field. Hovering over the icon shows a tooltip explaining how the changed value affects the cluster. In addition, a message appears above the dialog actions: "Some settings differ from their defaults and can affect the cluster's behaviour. Review the warning shown next to each highlighted setting before saving."
YAML tab
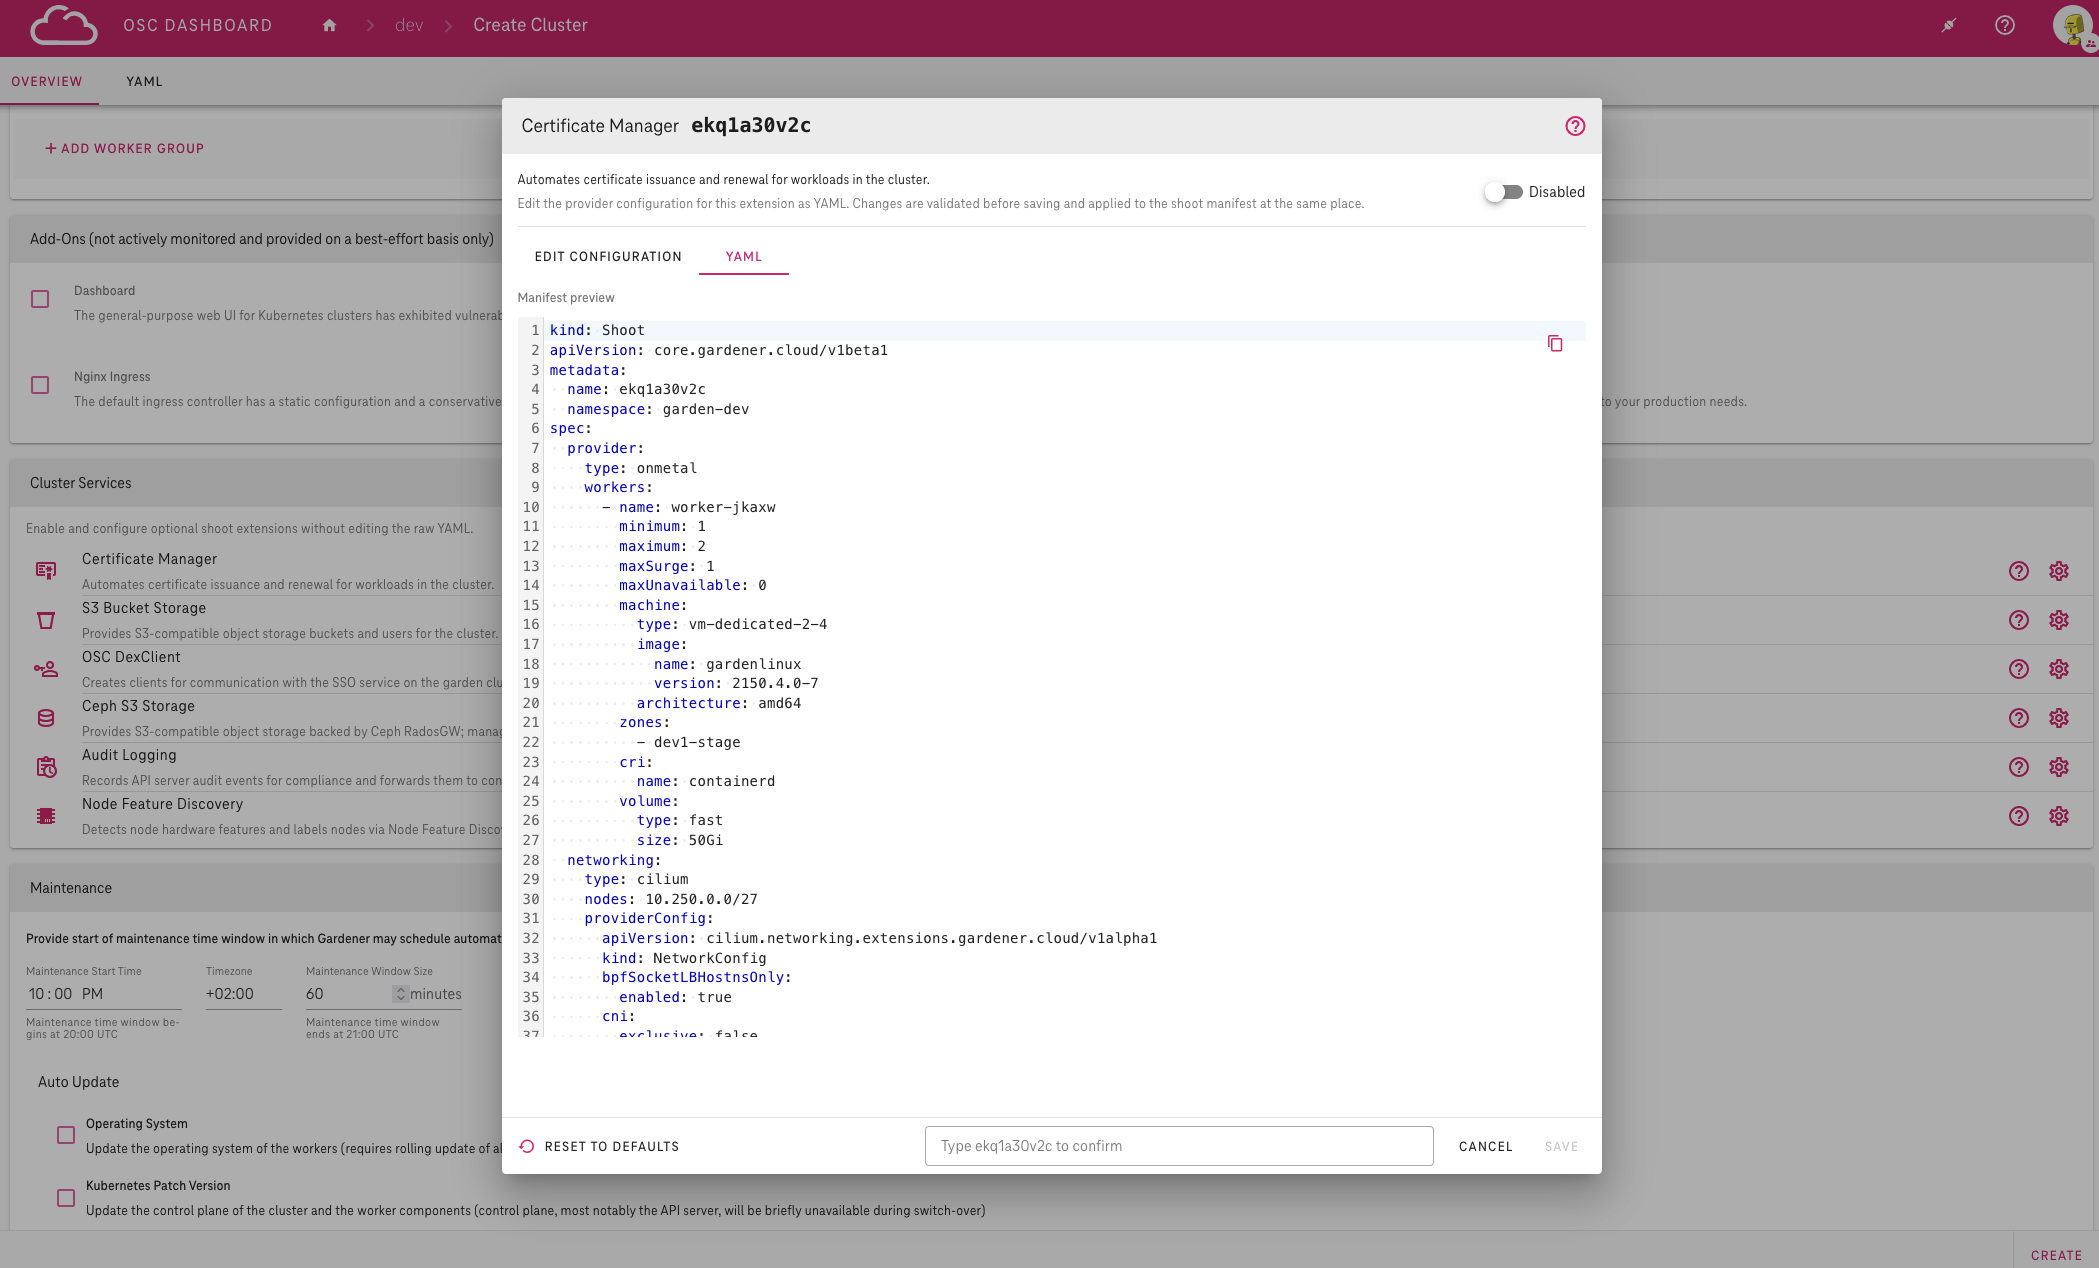
The YAML tab shows a Manifest preview of the whole Shoot manifest, including the changes made in the form. The manifest is editable and can be changed manually. If the manifest is not valid YAML, saving is blocked.
Manual YAML edits override the configuration form
The manifest in the YAML tab can be edited manually, and manual edits take precedence over everything configured in the Edit configuration tab. Once you edit the manifest, the extension is saved exactly as written in the YAML tab — the values from the configuration form are ignored. Changing a value in the form afterwards discards the manual edit and regenerates the manifest from the form again.
Confirming prerequisites
Some services require conditions that the OSC Dashboard cannot verify itself, for example objects that must already exist in your project namespace or a minimum Kubernetes version. For these services a Prerequisites section with one checkbox per condition is shown below the configuration form.
You must check and agree with all listed prerequisites before saving. If a prerequisite is not confirmed, clicking Save does not apply the changes — the dialog returns to the Edit configuration tab and highlights the Prerequisites section instead.
Note
The confirmations are reset every time the dialog is opened.
Note
Currently only the Node Feature Discovery shows a prerequisite (see Node Feature Discovery Configuration). The Audit Logging dialog has no prerequisite checkboxes, because it creates the required ConfigMaps for you.
Warnings, reset and saving
Depending on the service and your changes, a warning banner may appear above the dialog actions, for example when disabling a service has side effects or when settings differ from their defaults. Review the warning before saving.
- Reset to defaults: restores the default enablement state and the default configuration values of the service.
- Cancel: closes the dialog without saving.
- Save: applies the changes to the Shoot manifest. On an existing Shoot you must type the Shoot name into the confirmation field before saving.
Info
The reset only changes the dialog draft — nothing is applied to the Shoot until you click Save. On small screens the Reset to defaults button appears as a restore icon in the dialog title bar.
After a successful save the Shoot is queued for reconciliation and the message "Extension configuration was updated successfully" appears.
Available Services
| Service | Extension type | Configuration | Default | Documentation |
|---|---|---|---|---|
| Certificate Manager | osc-cert-manager-service |
Configuration page | Disabled | Cert-Manager Extension |
| S3 Bucket Storage | osc-s3-bucket-service |
Enable / disable | Enabled | S3 Bucket Extension |
| OSC DexClient | osc-dexclient-service |
Enable / disable | Enabled | DexClient Extension |
| Ceph S3 Storage | ceph-s3 |
Enable / disable | Enabled | Ceph S3 Extension |
| Audit Logging | audit |
Configuration page | Enabled | Audit Extension |
| Node Feature Discovery | osc-nfd-shoot-service |
Configuration page | Enabled | NFD Extension |
Note
Shoot peering is currently configured in its own Peering section of the Shoot detail page and is not part of Cluster Services. See Shoot peering management.