Shoot K8S version management
Note
If you want to use legacy Gardener Dashboard please refer to this documentation.
Downgrading
Currently not supported.
What to do if lower version is needed?
Deploy new shoot with one of lower version which are supported by us.
What to do, if upgrade is needed and we want to test it?
- Deploy another
test shoot, with same version of K8S as you have on the shoot cluster you want to upgrade. - Deploy applications you want/need to test on newer version
to shoot cluster from step
1. - Upgrade shoot cluster from step
1.to desired K8S version. - Delete shoot cluster from step
1. - Upgrade your existing cluster.
Upgrading
Before upgrading
Check if Sconified services, especially CAS is running in your cluster. If yes, follow the steps described in Upgrade K8s on Shoot Cluster with running CAS
Check supported K8S versions via kubectl directly on garden cluster
or in the OSC Dashboard (described later).
How to check directly on Garden cluster via kubectl
Execute following command:
kubectl get cloudprofiles.core.gardener.cloud onmetal -o=custom-columns='SUPPORTED K8S VERSIONS:.spec.kubernetes.versions[*].version' | sed s/,/\\n/g
example output of previous command:
SUPPORTED K8S VERSIONS
…some lines omitted…
1.28.10
1.28.11
1.28.14
1.28.15
1.29.9
1.29.12
1.30.8
1.31.4
Use grep to search for specific version, as on example below:
$ kubectl get cloudprofiles.core.gardener.cloud onmetal
-o=custom-columns='SUPPORTED K8S VERSIONS:.spec.kubernetes.versions[*].version'
| sed s/,/\\n/g | grep 1.25.9
# output after executing the command should be `1.25.9`
To upgrade K8S version, you can safely do it through OSC Dashboard
or by updating shoot yaml in the project namespace on garden cluster.
Through OSC Dashboard
Open OSC Dashboard
In the list of shoot cluster find the cluster you want to upgrade. Then as you can see on picture below follow these steps:
-
Open the Actions menu for the shoot you want to update
-
Select
Update Cluster.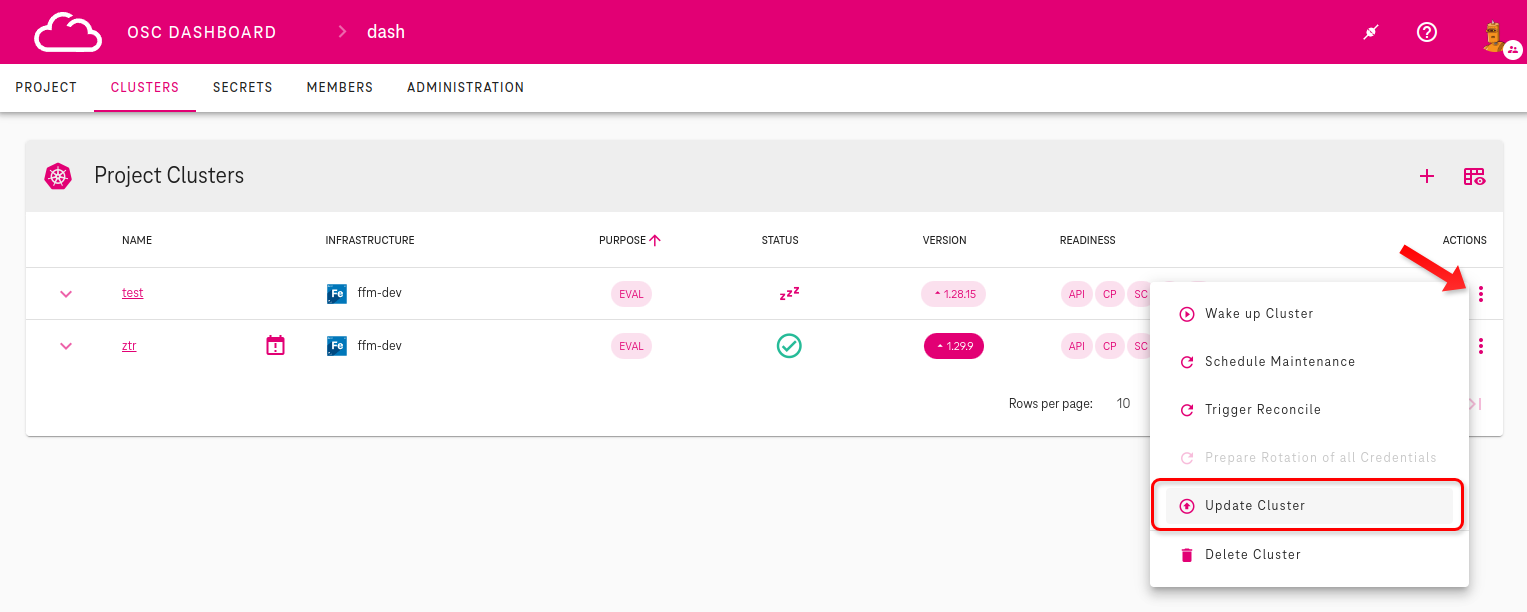
-
From drop-down menu
Upgrade to versionchoose accordingly from available upgrade options based on your desired K8S version.There is possibility, that you will need to upgrade more times, for example if shoot K8S version is 1.23.x and we want to upgrade to 1.26.x we would see in drop-down menu something like this, and we would need to upgrade first to 1.24.x, then 1.25.x and then 1.26.x:
- 1.23.x → 1.24.x
- 1.24.x → 1.25.x
- 1.25.x → 1.26.x
-
Then write or copy/paste shoot name for confirmation in the bottom-left field.
-
Click
UPDATEbutton to trigger the update which should be completed within some minutes.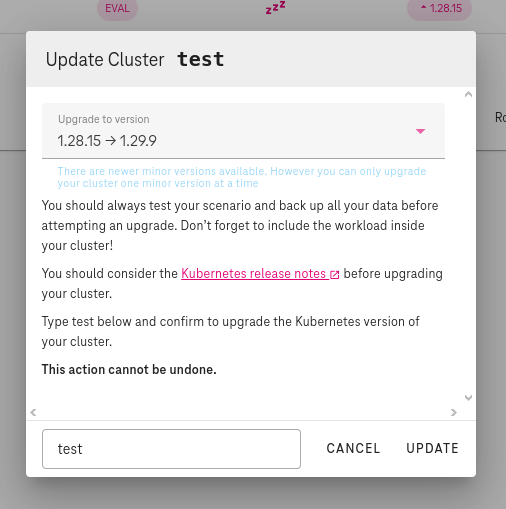
Through Shoot Manifest
This can be done in OSC Dashboard
and via kubectl directly on the garden cluster.
In OSC Dashboard
Let's take a look on how to do it through dashboard.
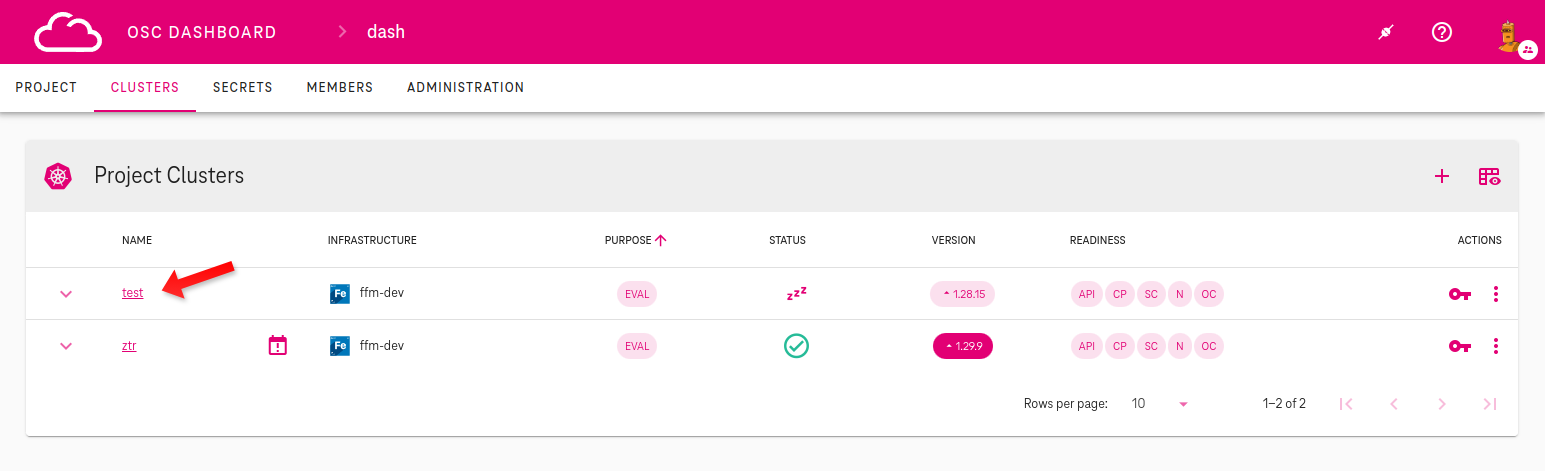
-
Click on shoot name in the list as shown on picture below.
-
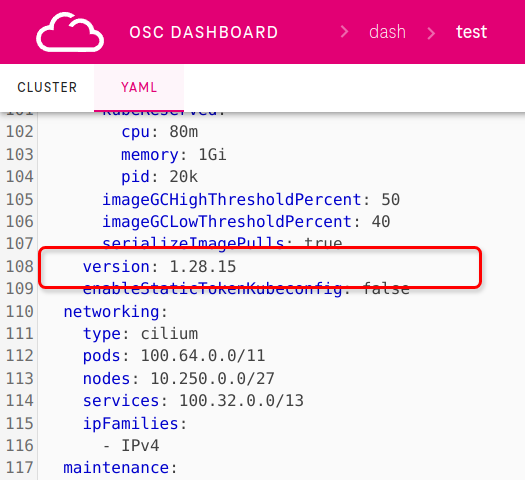
Click on YAML
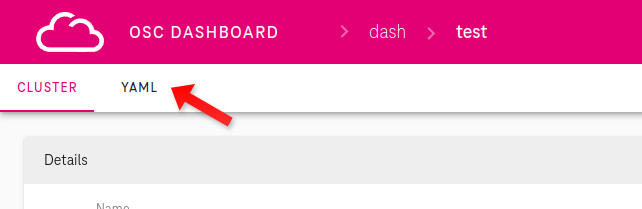
-
Search for version and re-write it to your desired version as shown on picture below:
On Garden Cluster using Kubectl
-
List shoot clusters by using
kubectl get shoots.core.gardener.cloud -Aas on Example.Example:
$ kubectl get shoots.core.gardener.cloud -A NAMESPACE NAME CLOUDPROFILE PROVIDER REGION K8S VERSION HIBERNATION LAST OPERATION STATUS AGE garden-dev shmr20-t00 onmetal onmetal mdb 1.26.2 Awake Reconcile Succeeded (100%) unhealthy 2d23h garden-dev shmr20-t01 onmetal onmetal mdb 1.26.2 Awake Reconcile Processing (88%) unknown 6h31m garden-dev shmr20-t02 onmetal onmetal mdb 1.26.2 Awake Reconcile Processing (82%) unhealthy 5h55m -
Edit the same field
version:in the shoot manifest. To do it we can use following command:{ .zsh .copy } kubectl edit shoots.core.gardener.cloud <your-shoot-cluster-name> \ -n <your-shoot-cluster-namespace-from-previous-command> -
Save by
:wq!and wait for reconciliation to finish.We could do it locally by getting yaml from the cluster executing:
kubectl get shoots.core.gardener.cloud <your-shoot-cluster-name> \
  -n <your-shoot-cluster-namespace-from-previous-command> -o yaml > <your-shoot-cluster-name>.yaml
then edit and save the manifest and apply it on the cluster using:
kubectl apply -f <your-shoot-cluster-name>.yaml
Upgrade K8s on Shoot Cluster with running CAS
Upgrading a shoot cluster with running CAS (Configuration and Attestation Service) instances require special attention because the CAS is tightly coupled to the physical nodes it runs on. This coupling is due to the CAS database key being encrypted with a CPU-specific seal key - meaning the key material needed to access the CAS database is only available on the original host’s CPU. As a result, if a CAS instance is moved or restarted on a different node (as often happens during upgrades or node replacements in cloud-native environments), it cannot decrypt its own data, leading to potential data inaccessibility or service disruption. This tight binding to hardware complicates cloud-native management, where practices like automated scaling, rolling upgrades, and node replacements are common.
To ensure a smooth upgrade process, it is recommended to migrate the CAS instances to a new worker pool before upgrading the shoot cluster.
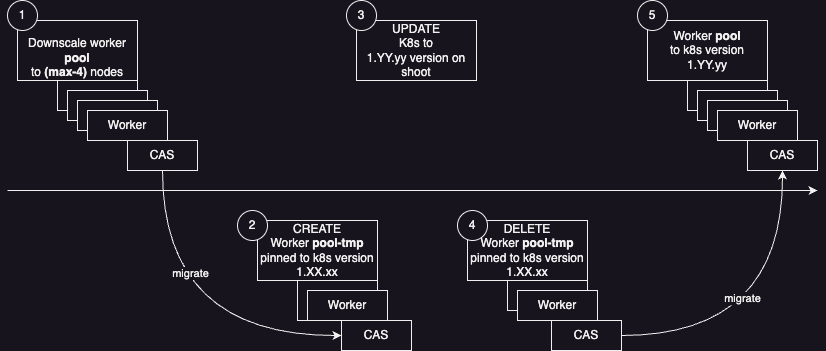
The steps to follow are:
- Create a backup of the CAS database
- Downscale nodes in origin worker pool
- Create new temporary worker pool
- Migrate CAS pod to a node in the newly created worker pool
- Upgrade the origin worker pool to target version
- Migrate CAS back to origin worker pool
- Delete temporary worker pool
- Upscale nodes in origin worker pool
Steps
Create a backup of the CAS database
-
Before starting the upgrade process, it is crucial to create a backup of the CAS database. This ensures that you have a restore point in case anything goes wrong during the upgrade process.
Please consult to the Scone User Guide on how to create a backup of the CAS database.
Downscale nodes in origin worker pool
If there is limit of workers reached in the shoot cluster, we need to downscale so that at least 3 nodes can be added to the new temporary worker pool.
-
Check we can at least create 3 nodes in the Shoot Cluster
According to Determining Available IP Addresses in a Shoot Cluster verify at least 3 IP Addresses are available in the Shoot Cluster.
-
Scaling down the workergroup
If there are not at least 3 IP Addresses available, you need to decrease the number of nodes in the shoot cluster by scaling down first.
Create a new temporary worker pool
Create a new worker pool with 3 nodes (1 node in each availability zone). This new worker pool will be used to migrate the CAS instances.
-
Create additional worker pool with 3 nodes (one node in each Availability Zone)
Please duplicate the specification of the current worker pool and adjust the fields below. This can be done with yaml-view of the worker group within the gardner dashboard.
spec.provider.workers[].kubernetes.version:1.XX.xxThis version of the kubernetes nodes needs to be pinned to current version. This is crucial - add this field if it is not present.spec.provider.workers[].name:pool-tmpspec.provider.workers[].minimum:3spec.provider.workers[].maximum:3
The yaml should look like this
spec:
 provider:
   workers:
     - cri:
         name: containerd
# usually there is no need to set kubernetes version here which then uses the version from control plane.
#            kubernetes:
#            version: 1.30.10
       name: pool-worker
       machine:
         type: vm-dedicated-sgx-4-16-16
         image:
           name: gardenlinux
           version: 1605.0.5
         architecture: amd64
       maximum: 6
       minimum: 3
       maxSurge: 1
       maxUnavailable: 0
       volume:
         type: fast
         size: 50Gi
       zones:
         - ffm1-dev
         - ffm2-dev
         - ffm3-dev
       systemComponents:
         allow: true
     - cri:
         name: containerd
# the kubernetes for the new worker pool needs to be pinned to the current version,
# so that the worker group will stick to the current version and not be upgraded later
       kubernetes:
         version: 1.30.10 # this version needs to be pinned to current version
       name: pool-tmp
       machine:
         type: vm-dedicated-sgx-4-16-16
         image:
           name: gardenlinux
           version: 1605.0.5 # this version needs to be pinned to current version
         architecture: amd64
       maximum: 3
       minimum: 3
       maxSurge: 1
       maxUnavailable: 0
       volume:
         type: fast
         size: 50Gi
       zones:
         - ffm1-dev
         - ffm2-dev
         - ffm3-dev
       systemComponents:
         allow: true
This snippet can be added through Gardener Dashboard or directly on Garden Cluster into Shoot Cluster YAML manifest, please see 08-Shoot-worker-pool-management.
-
Save the shoot configuration and wait for reconciliation to finish.
It should have created 3 new worker nodes in temporary worker pool. Check if worker nodes from temporary worker pool were created and joined into the cluster.
kubectl get nodes -l worker.gardener.cloud/pool=pool-tmpThe additional worker pool should be in
Readystate. -
Check if CAS is healthy and additional worker nodes are registered to host the CAS
kubectl get cas cas -n osc-scone-system# format for cas-registered label: cas-registered-<cas-name>.<namespace>-<version> kubectl get nodes -L cas-registered-cas.osc-scone-system-5.9.0 \ -L las.scontain.com/capable \ -L las.scontain.com/okIf you are running multiple CAS instances, verify that all instances are healthy and registered to the new worker pool.
Migrate CAS pod to a node in the newly created worker pool
Since CAS 5.9.0 pods tolerate nodes which are tainted
node.kubernetes.io/unschedulable:NoSchedule we cannot only cordon/uncordon
the nodes in the origin worker pool. We' d better taint the nodes in the origin
worker pool and delete the cas pod to force it to reschedule on a node in the
new temporary worker pool.
-
Migrate cas pod to a node of the new temporary worker pool
# taint nodes of the current worker pool
kubectl taint node -l worker.gardener.cloud/pool=pool-worker \
   osc.tsystems.com/migrate-cas=true:NoSchedule

# delete cas-0 pod to force it to reschedule on a node in the new temporary worker pool
kubectl delete pod cas-0 -n osc-scone-system

# wait for cas to become healthy again
kubectl get cas cas -n osc-scone-system

# check pod is running on a node of the new temporary worker pool
kubectl get pods -n osc-scone-system -o wide | grep cas-0

# remove the taint from nodes in origin worker pool
kubectl taint node -l worker.gardener.cloud/pool=pool-worker \
   osc.tsystems.com/migrate-cas=true:NoSchedule-
Upgrade the origin worker pool to target version
Perform the upgrade on the original worker pool to the desired Kubernetes version or configuration. Ensure that the upgrade process does not disrupt the running CAS instances by keeping them on the temporary pool during this phase.
-
Proceed with update of Shoot Cluster by following the steps 08-Shoot-k8s-version-management.
Wait for the all the nodes in worker pool in
pool-workerto be upgraded and healthy. -
Check if the worker nodes are healthy and running the desired version of Kubernetes
kubectl get nodes -l worker.gardener.cloud/pool=pool-worker -
Check if CAS is healthy and all replaced worker nodes are registered to host the CAS
kubectl get cas cas -n osc-scone-system# format for cas-registered label: cas-registered-<cas-name>.<namespace>-<version> kubectl get nodes -L cas-registered-cas.osc-scone-system-5.9.0 \ -L las.scontain.com/capable \ -L las.scontain.com/okIf you are running multiple CAS instances, verify that all instances are healthy and all replaced nodes are registered to host a CAS in the origin worker pool.
Migrate CAS back to origin worker pool
Since CAS pods tolerate nodes which are tainted
node.kubernetes.io/unschedulable:NoSchedule we cannot only cordon/uncordon
the nodes in the temporary worker pool. We' d better taint the nodes in the
temporary worker pool and delete the cas pod to force it to reschedule on a
node in the upgraded origin worker pool.
-
Migrate cas pod to a node of the origin upgraded worker pool
 # taint nodes of the current worker pool
kubectl taint node -l worker.gardener.cloud/pool=pool-tmp \
   osc.tsystems.com/migrate-cas=true:NoSchedule

# delete cas-0 pod to force it to reschedule on a node in the updated origin worker pool
kubectl delete pod cas-0 -n osc-scone-system

# wait for cas to become healthy again
kubectl get cas cas -n osc-scone-system

# check pod is running on a node of the new temporary worker pool
kubectl get pods -n osc-scone-system -o wide | grep cas-0

# remove the taint from nodes in temporary worker pool
 kubectl taint node -l worker.gardener.cloud/pool=pool-tmp \
   osc.tsystems.com/migrate-cas=true:NoSchedule-
Delete temporary worker pool
Once the upgrade is complete and the original pool is stable, decommission the temporary worker pool to optimize resource usage and costs.
- Delete the temporary worker pool
This can be done from within the gardner dashboard. Or remove the worker
pool
pool-tmpfrom the shoot manifest and save it. Wait for reconciliation to finish.
Upscale nodes in worker pool
Scale up the nodes in the original worker pool to the desired number of nodes as if was before. This ensures that you have enough resources to handle your workloads after the upgrade again.
- If there was need to downscale the nodes in the original worker pool in order to create a new temporary worker pool, then scale up the nodes in the original worker pool to the desired number of nodes as it was before.