Shoot Peering
Shoot peering establishes direct network connectivity between the node subnets of two or more shoot clusters. It allows workloads running on the nodes of peered shoots to communicate with each other over their node IP addresses.
Peering is managed via the osc-peering-service extension on each shoot.
When configured, the extension creates ShootPeering resources on the seed cluster,
which the peering controller uses to set up route announcements between the cluster networks.
Info
Shoot peering operates at the node network level. Only node IP addresses are routed between peered clusters. Pod IPs and service IPs are not reachable across a peering.
Prerequisites
Before configuring a peering, make sure the following conditions are met:
- Both shoots are managed within the same Garden cluster. Cross-Garden peering is not supported.
- The node CIDRs of the two shoots do not overlap. Identical node CIDRs prevent peering entirely. A default node CIDR on one side may cause asymmetric connectivity.
- Both shoots must configure each other as a peering target. A one-sided configuration is incomplete and the peering will not become active.
Warning
If you intend to peer shoots, plan their node CIDRs carefully before creation. Changing or expanding a node CIDR after the fact requires reconciliation and shrinking is not possible. See Shoot CIDR information for details.
Configuring Peering in the Dashboard
Adding a Peering
On an existing shoot
- Open the shoot detail page and scroll to the Peering section.
- Click the Configure Peering button in the top-right corner of the section.
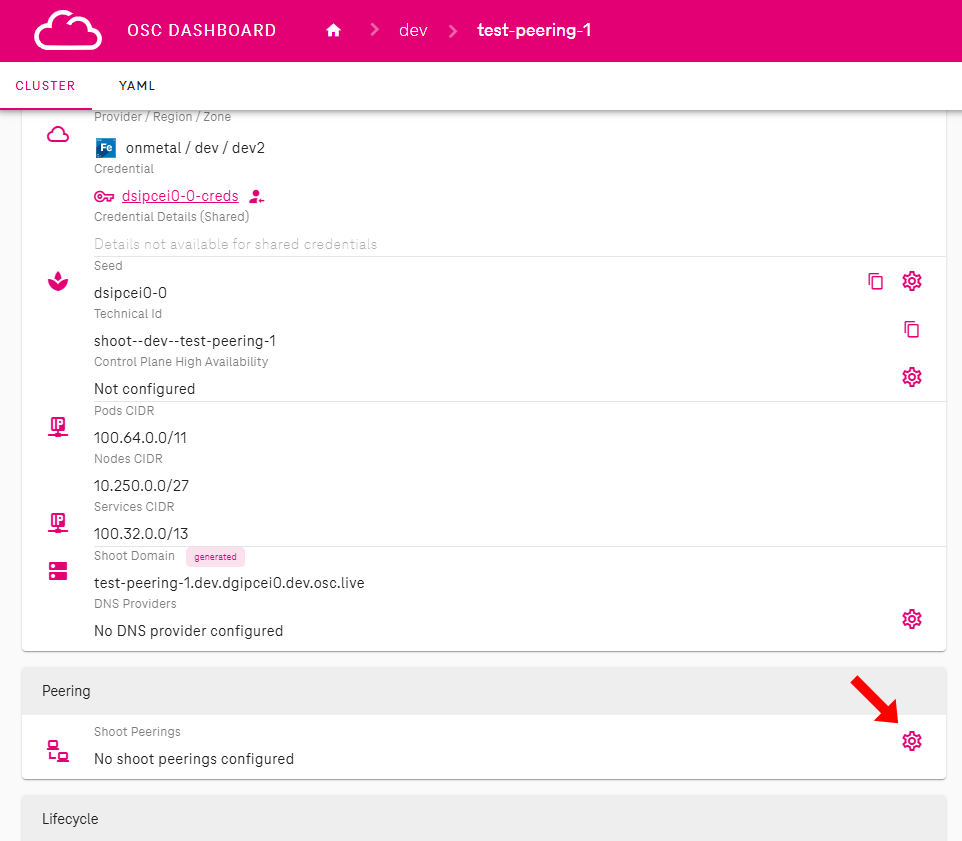
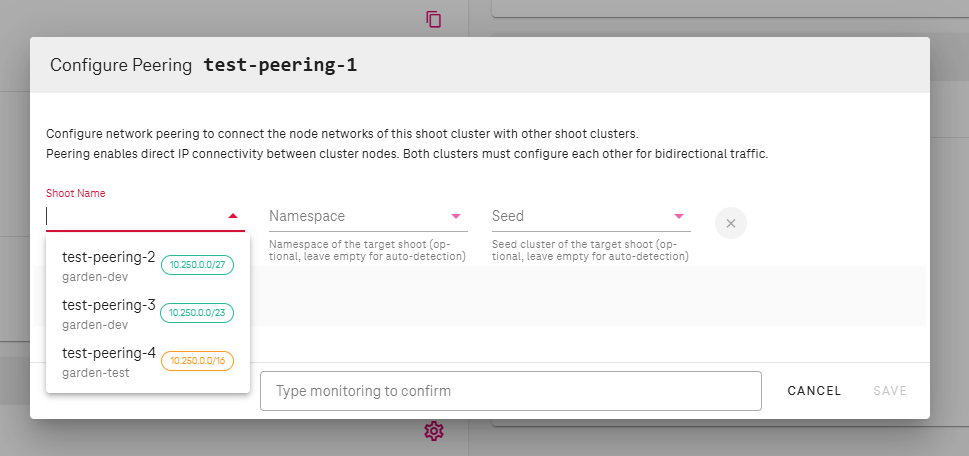
- A dialog opens showing the current peering configuration. Click Add Peering inside the dialog.
- Start typing the name of the target shoot in the input field. The field provides autocomplete suggestions based on shoots in your project.
- Select the target shoot. Namespace and seed are filled in automatically.
- Confirm the dialog to save.
During shoot creation
Peering can also be configured when creating a new shoot, avoiding the need to open the Configure Peering dialog afterwards.
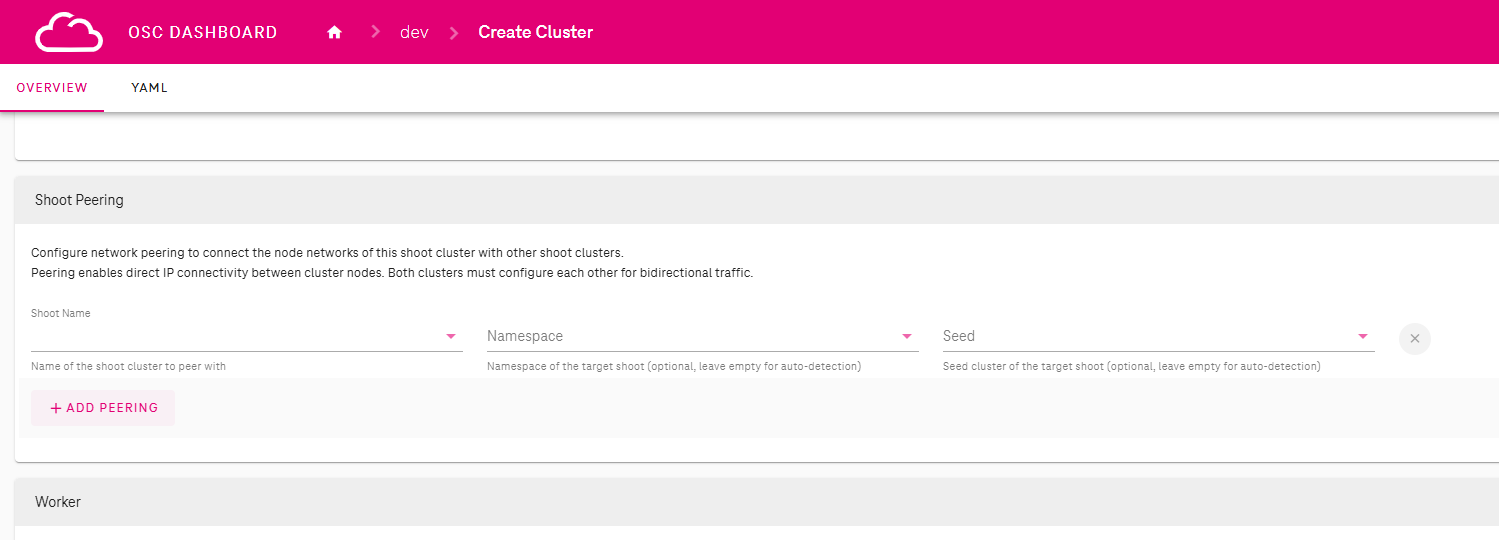
- In your project, click Create Cluster to open the new shoot form.
- Scroll to the Peering Configuration section.
- Click Add Peering and start typing the name of the target shoot. Autocomplete suggestions appear for shoots in your project.
- Select the target shoot. Add further targets if needed.
- Fill in the remaining fields and click Create.
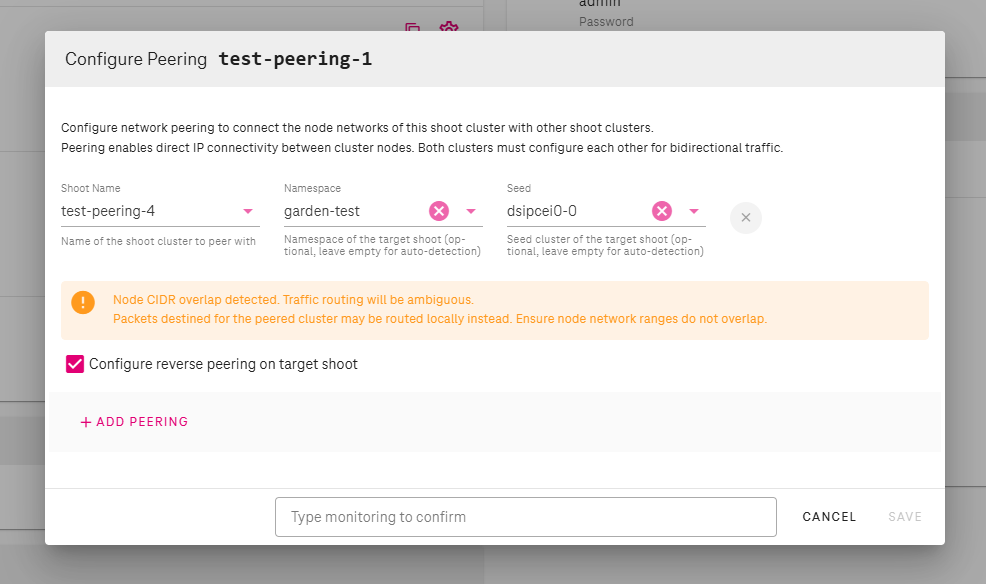
After the shoot is created, the dashboard automatically updates each target shoot to add the reverse peering entry on your behalf. This happens only when the Configure reverse peering on target shoot checkbox is checked, which it is by default.
Note
If the new shoot is later deleted, the reverse entries added to the target shoots are not removed automatically. Before deleting the shoot, remove its peering entries with Remove reverse peering on target shoot checked when prompted (checked by default). The Delete Cluster dialog also warns you if the shoot still has active peering entries at the time of deletion.
Target shoots in projects you cannot access must be updated manually by their owners.
CIDR Conflict Detection
If the node CIDR of the selected target shoot overlaps with the node CIDR of the current shoot, the dashboard displays a warning. A peering with overlapping CIDRs will not function correctly.
Review the node CIDRs of both shoots and resolve the conflict before proceeding.
Reverse Peering
Because peering is a bidirectional contract, both shoots must list each other as a peering target. When you add a peering on shoot A pointing to shoot B, the dashboard detects whether the corresponding entry on shoot B is already present.
If the reverse entry is missing and you have access to shoot B, a checkbox appears below the peering entry offering to configure it automatically when you save.
If you do not have access to shoot B (for example, it is in a different project), you or the owner of shoot B must add the reverse entry manually.
Saving and Reconciliation
After saving, the shoot is queued for reconciliation.
Once reconciliation completes, ShootPeering resources appear on the seed cluster
and the peering controller begins announcing routes between the two cluster networks.
Peering Status
The peering section on the shoot detail page shows a status icon next to each configured peering. Hovering over the icon displays a tooltip with a description of the current status.
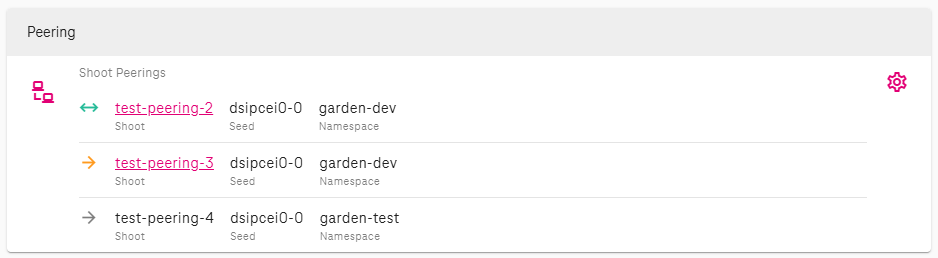
| Icon | Tooltip | Meaning |
|---|---|---|
| Green double arrow (↔) | Peering configured on both shoots | Both sides are configured. |
| Orange single arrow (→) | Incomplete - target shoot has no reverse peering configured | This shoot points to the target, but the target has no reverse entry. |
| Grey single arrow (→) | Target shoot not accessible - cannot verify reverse peering | The target shoot is in a project you cannot access. The reverse status is unknown. |
Removing a Peering
Removing from One Side
- Open the shoot editor and navigate to the Peering section.
- Click the remove button next to the peering entry you want to delete.
- Confirm the removal.
After saving, the shoot reconciles and the corresponding ShootPeering resources
are removed from the seed cluster.
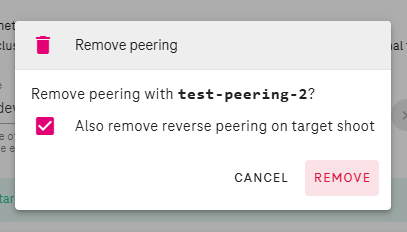
Automatic Reverse Cleanup
When you remove a peering entry, the dashboard checks whether the reverse entry on the target shoot is still present. If it is, and you have access to the target shoot, the dashboard offers to remove it automatically.
If the target shoot is in a project you cannot access, you or the owner of that shoot must remove the reverse entry manually. Leaving a one-sided peering entry in place does not cause harm, but the status on the target shoot will show as Missing.
YAML Reference
The dashboard configures peering by writing an extension entry into the shoot's manifest.
The following example shows what the resulting YAML looks like for a shoot named test-peering-1
in namespace garden-dev on seed seed-1, peered with test-peering-2:
apiVersion: core.gardener.cloud/v1beta1
kind: Shoot
metadata:
  name: test-peering-1
  namespace: garden-dev
spec:
  extensions:
    - type: osc-peering-service
      providerConfig:
        apiVersion: service.peering.extensions.osc.t-systems.com/v1
        kind: PeeringConfig
        shootPeerings:
          - name: test-peering-2
            namespace: garden-dev
            seed: seed-1
For a bidirectional peering, test-peering-2 must have the corresponding reverse entry:
spec:
  extensions:
    - type: osc-peering-service
      providerConfig:
        apiVersion: service.peering.extensions.osc.t-systems.com/v1
        kind: PeeringConfig
        shootPeerings:
          - name: test-peering-1
            namespace: garden-dev
            seed: seed-1
The dashboard fills namespace and seed automatically when a shoot is selected from the autocomplete.
For the full extension specification and limitations, see the ShootPeering Extension reference.